
Using Iridient Developer with Adobe Lightroom
The information below details getting photos already stored in a Lightroom catalog into Iridient Developer using Lightroom itself, in addition to working through Lightroom to open images you can always open your original image files directly into Iridient Developer independently from Lightroom using drag and drop from the Finder or using the Open dialog. Just because an image has been imported into your Lightroom catalog there is no requirement that you only use Lightroom to access or process your image.
Opening original (unedited) images from Lightroom into Iridient Developer
I find use of drag and drop to be the quickest and easiest way to get images from Lightroom into Iridient Developer. Simply click and drag the thumbnail icon of the image(s) you would like to open in Iridient Developer from Lightroom to the Iridient Developer icon in the Dock or onto the Iridient Developer preview window. You can drag and drop from the thumbnail strip along the bottom of the Lightroom window in any of the modules (Library, Develop, Map, Book, etc) or also from the larger thumbnail grid view when in the Library module. You can drag single images or multiple images using command+click for non-contiguous selections or command+shift+click for contiguous selections (same command keys for making selections in Iridient too). Note that if you use Lightroom's "Full Screen" view mode you will not be able to drag and drop images to the dock, however if you use the "Full Screen with Menu Bar" mode you can still access the Dock for drag and drop.
Using Iridient Developer as an external editor
If you are working with RAW images unfortunately Lightroom does not directly support external editing of RAW images. Beginning with Iridient Developer 2.4 you can now search for and open RAW images based on the file name of the external edit file created by Lightroom. In Lightroom you must setup the external editing options so that it includes the original RAW filename. Then by enabling the "Find and load RAW..." option in the Preferences dialog of Iridient Developer you can set it up to automatically find and open RAW images based on the processed external edit image sent by Lightroom. One disadvantage of using the external editor interface is that it is slightly slower than using the drag and drop method above due to Lightroom having to first process and save the intermediate image before sending it on for external editing by Iridient Developer. With RAW files the processed image prepared by Lightroom will simply be overwritten. However, a very nice advantage to using the external editor interface is that the images can automatically be stacked with the original in Lightroom and there is no need for any extra import or folder synchronization process after processing the image out of Iridient Developer. For many the ease of getting images from Iridient Developer back into Lightroom will outweigh the extra Lightroom rendering time for the intermediate image.
To setup external editor options in Lightroom:
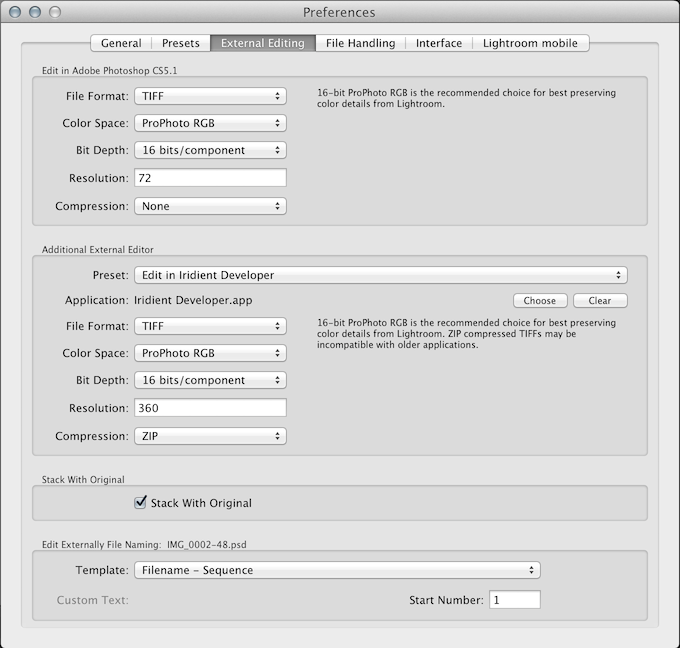
- Choose "Preferences..." from the File menu in Lightroom or key combo command+comma.
- Click the "External Editing" button near the top of the dialog.
- In the Additional External Editor section click the Choose button and select the Iridient Developer application.
- Iridient Developer supports all external editing formats (TIFF, PSD, JPEG), color spaces, bit depth options and compression options offered by Lightroom so you are free to choose whatever works best for your needs. 16 bits/channel TIFF would be recommended for highest quality but it will take the most disk space. ZIP compression for TIFF will save some disk space at the cost of extra processing time for the compression. 8 bits/channel will take up half the disk space, sometimes even less when using compression and JPEG format will be the smallest, but uses lossy compression that isn't ideal for repeated editing and saving passes.
- After setting up the various external editor options you can save a new preset by choosing "Save Current Settings as New Preset" from the Preset popup menu and then you can store a specific name for your preset such as "Iridient Developer TIFF".
Here is an example external editor preset for Iridient Developer:
To setup Iridient Developer to automatically load the source RAW image when being used as an external editor:
- Choose "Preferences..." from the Iridient Developer menu or key combo command+comma.
- In the General section of the dialog check the "Find and load RAW..." checkbox.
- Click the OK button to close and save the Preferences.
After setting up the above external editor options in the Preferences dialogs to open images using Iridient Developer as an external editor choose "Open In -> Iridient Developer" from the Photo menu or in the context menu that can be opened by right clicking on an image or using control+click. If you saved an external editor preset for Iridient Developer you can also choose that preset by its name from this menu. If Iridient Developer is setup as the primary external editor you can open it using the key combo command+option+E.
A nice video demonstration of setting up Iridient Developer for use as an external editor with Lightroom can be found on Thomas Fitzgerald's blog here (about 5 minutes): Iridient Developer 2.4 Lightroom Integration Video
Using Iridient Developer from the plug-in interface
Another option for opening RAW images into Iridient Developer is to use a plug-in called "Open Directly" by John Beardsworth. Information on use of this plug-in can be found here.
Using Iridient Developer with Export
And finally you can also use the Export options in Lightroom to export either processed images in TIFF, PSD or JPEG formats or RAW images converted to DNG or in original for use with Iridient Developer. To view the Export dialog choose "Export..." or key combo command+shift+E. After setting up the Export options you can quickly access the last settings used or save presets specifically for use with Iridient Developer. The Export presets can be accessed in the contextual menu when right clicking or control clicking on an image under the Export item. The main disadvantage to Export is that it creates copies of the original images and in the case of RAW files these copies can be quite large, with images you intend to initially process in Lightroom prior to working in Iridient Developer it is much like the External Editor interface, but does provide some additional options for image sizing, file naming and so on.
Getting Processed Images from Iridient Developer Back Into Lightroom
If you are using the extrnal editing functionality it is very easy to get your processed images from Iridient Developer back into Lightroom. Simply overwrite the external editing image and the modified image will automatically appear in your Lightroom catalog. In Iridient Developer 2.4 you can choose "Process Image and Overwrite (Std Image)" from the File menu or use the key combination command+option+E to quickly overwrite the intermediate image using the same file format, bit depth, color space, dpi and compression options as setup in Lightroom. For more control over the export settings you can use the normal Save dialog by choosing "Process Image and Save As..." from the File menu or key combo command+E. You will need to be sure to use the identical file name and folder location as the original Lightroom intermediate file in order to have the Iridient Developer processed file automatically update the image in Lightroom.
You can also use Lightroom's Auto Import functionality to setup a folder for auto importing processed images from Iridient Developer back into Lightroom. See the File -> Auto Import -> Auto Import Settings dialog to setup an auto import folder. After the Auto Import folder has been setup choose File -> Auto Import -> Enable Auto Import to enable the auto import action. Save your processed images from Iridient Developer into this folder and they will automatically be imported into your Lightroom catalog.
A third option for getting processed images back into your Lightroom catalog is using the Library -> Synchronize Folder feature. In Iridient Developer save your processed images back to the same folder as the originals. An easy way to do this is to choose "Original Image Folder" for the Default Save To Folder in lower section of the Save dialog. Then when in the Library module of Lightroom you can select the Folder and choose "Synchronize Folder..." from the Library menu. This will display a dialog in which you enable "Import new photos" and it will import the new photos into your Lightroom catalog.
And finally you can also import images processed from Iridient Developer using the Import dialog in Lightroom by clicking the Import... button in the Library module or choosing Import Photos and Video... from the File menu or using key combo command+shift+I.
| Copyright © 2014 Iridient Digital, Inc. All Rights Reserved. | Adobe and Lightroom are either registered trademarks or trademarks of Adobe Systems Incorporated in the United States and/or other countries. | PRIVACY POLICY |